Install & use
Let AI check your environment and install
AI checks Hub on your computer first: reuse a compatible installation; otherwise source access is required before building for your system. Hub has not been officially released and only needs to be installed once for all apps.
Public source v0.1.0 · macOS 15+ / Apple SiliconmacOS 15+ · Apple Silicon · Hub with Gray16 image support · NOTE4
Currently supports only macOS 15+ on Apple Silicon. Requires a compatible Hub with the 2026-10-17 image Runtime extension and Gray16 support. That build has not been published as a public Hub release, and the Hub repository is currently private.
Hub has not been officially released; its repository and bundled device SDK are private. Reuse a compatible Hub if available. Initial installation requires access to the relevant source.
- 1
Check the Mac, NAS and Hub
Currently requires an Apple Silicon Mac running macOS 15 or later. Mount the NAS photo share in Finder. Reuse a compatible Hub with the 2026-10-17 image Runtime extension and verify that it advertises Gray16 support. The Hub repository is private; without an existing compatible build or source access, pause device installation.
- 2
Prepare the gallery from source
Read the current README and v0.1.0 release notes in the public repository, then build the app on the Mac and connect it to Hub. Keep photo paths, caches and personal settings on this computer, and preserve existing apps and data.
- 3
Choose folders and verify one photo
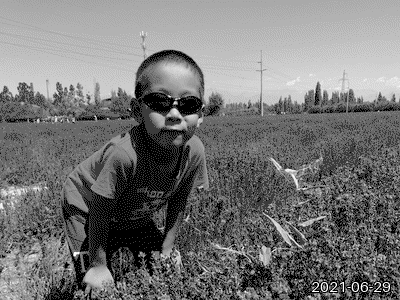
Set the mounted photo folder, cache folder and slideshow interval in the management page. Check face-aware cropping, the bottom-right YYYY-MM-DD date, device display receipts and Up/Down navigation before enabling the slideshow. Photos without a reliable capture date are skipped.
Paste into Codex or another local AI on your computer. AI checks the system, reuses or builds the connection helper, then prepares the app from source. Hub and SDK source are private; initial installation requires access.
See the task for AI
Help me install and verify “NAS Gallery” on my computer.
Project repository: https://github.com/itopinion/zectrix-nas-gallery
Installation guide: https://github.com/itopinion/zectrix-nas-gallery/blob/main/README.md
Site review date: 2026-10-17; reference commit: bc89e341e0c2e31bc6a884984aa72ce54c70bb23. Recheck the current version before proceeding.
Project requirements: macOS 15+ · Apple Silicon · Hub with Gray16 image support · NOTE4
Availability: Public source v0.1.0 · macOS 15+ / Apple Silicon
The app source is public. Hub has not been officially released; its repository and bundled device SDK remain private.
Common device SDK source: https://github.com/itopinion/zectrix-hub/tree/main/crates/zectrix-cards/vendor/sdk (currently in a private repository; access required).
Cross-platform guide: https://github.com/itopinion/zectrix-hub/blob/main/docs/PORTING.md. Check compatibility between the current SDK and device firmware; do not blindly use versions from old documentation.
Identify the operating system, processor architecture and build toolchain first. Build from project source and the matching SDK for this system; do not download or distribute prebuilt Mac app packages. Create an isolated runtime for Python projects on the target system.

Prepare the shared connection helper first, then install the app:
1. Check whether ZECTRIX Hub (https://github.com/itopinion/zectrix-hub) is already installed, including its running status, version and app interfaces. Reuse a compatible installation; do not reinstall, overwrite existing apps, settings or data, or open a competing device connection.
2. If Hub is missing, first confirm access to Hub and matching SDK source. Hub has not been officially released and its repository is private. Without access, explain the unavailable dependency and pause device installation. Do not request tokens in chat or change repository visibility.
3. If Hub exists but is incompatible, explain the differences and upgrade plan first and preserve existing data. Check the exact compatibility between Hub's bundled SDK and device firmware. Do not infer compatibility solely from an old README's minimum version, or automatically flash or replace firmware. NOTE4C is outside this app's scope.
4. Put NOTE4 and the computer on the same LAN and enter local push mode. Let Hub discover and select the device and hold the connection. This flow does not require a ZECTRIX Cloud API Key or manually entering a MAC first.

Installation and usage steps for this project:
1. Check the Mac, NAS and Hub: Currently requires an Apple Silicon Mac running macOS 15 or later. Mount the NAS photo share in Finder. Reuse a compatible Hub with the 2026-10-17 image Runtime extension and verify that it advertises Gray16 support. The Hub repository is private; without an existing compatible build or source access, pause device installation.
2. Prepare the gallery from source: Read the current README and v0.1.0 release notes in the public repository, then build the app on the Mac and connect it to Hub. Keep photo paths, caches and personal settings on this computer, and preserve existing apps and data.
3. Choose folders and verify one photo: Set the mounted photo folder, cache folder and slideshow interval in the management page. Check face-aware cropping, the bottom-right YYYY-MM-DD date, device display receipts and Up/Down navigation before enabling the slideshow. Photos without a reliable capture date are skipped.
The app works through Hub Runtime API. The connection layer uses the device SDK; downloading the SDK alone does not replace Hub. Check platform-specific paths, process management, build dependencies and speech backends, adapting as needed. Successful compilation does not verify cross-platform functionality.

First verification: Using your mounted photo folder, verify a full-screen portrait and its capture date on NOTE4, Up/Down navigation and pause. Check device receipts and the physical screen separately, and confirm the NAS originals remain unchanged.
Report program startup, image generation, device reception and physical-screen verification separately. Do not treat successful simulation as real-device verification. Explain installation location, how to restart and stop, and limits when the computer or network disconnects.
Keep keys, Hub credentials, accounts and personal data in local configuration only, never shared tasks or logs. If this AI has no local execution environment, provide reviewable local installation steps first; do not claim installation is complete.
After installation, confirm this
Using your mounted photo folder, verify a full-screen portrait and its capture date on NOTE4, Up/Down navigation and pause. Check device receipts and the physical screen separately, and confirm the NAS originals remain unchanged.
v0.1.0 publicly released · Local installation and device display receipts verified. Copying the task does not install anything automatically.
Frequently asked questions
Are photos uploaded to the cloud?
The Mac reads NAS originals and detects faces locally, then sends frames through Hub over the local network. Originals stay on the NAS. Only successfully displayed small frames enter the persistent cache; prepared frames are temporary and cleared on exit.
Can it run directly on Windows, Linux or Synology DSM?
Portrait filtering currently depends on macOS Vision. The release and validation scope is macOS 15+ on Apple Silicon. The NAS supplies a shared folder while the player runs on the Mac; other systems have not been adapted.
Why are some photos skipped?
The app requires camera provenance, a human face and a reliable capture date. Screenshots, scenery without people, missing metadata, and very small or low-confidence faces are skipped. File modification time is not used as the capture date.
Can I keep viewing photos when the NAS disconnects?
You can revisit cached small frames. Initial setup and new photos still need NAS access. The Mac, Hub and gallery app must remain running.